This script is available for purchase from CodeCanyon.com.
https://codecanyon.net/item/directory-hub-listing-classified-platform/26890239
Content
- Demo
- Features
- Requirement
- Install
- Configuration
- Site Management
- Upgrade Instruction
- License Terms
- Help & Support
- Update History
Introduction
Directory Hub is a business directory PHP script, inspired by Yelp and Yellow Pages, integrated classified ads module, offers features like multiple-countries support, unlimited-level categories, custom fields, listing with multiple categories, business listings, and products listings, which give buyers the maximum ability to make any type of business or niche directory website.
Directory Hub offers you the CMS platform to build all kinds of business directory websites. It is highly customizable and is the trending business directory script solution in the market to organize your business directory portal.
Directory Hub built based on PHP and Laravel Framework, which gives the developers massive ability to extend and customize the business listing and classified web application to their own needs and specifications.
Use Cases:
- Restaurants and bars directory
- Health care directory
- Automotive listings (dealers, repair, parts and supplies, tires, etc)
- Church listings
- Local area directory
- Night life directory
- Pets directory
- and much more
Demo
- Homepage: https://directoryhub.alphastir.com
- Login: https://directoryhub.alphastir.com/login
- Signup: https://directoryhub.alphastir.com/register
- Admin: admin@mail.com / 12345678
- User 1: kennedi.yuic@yahoo.com / 12345678
- User 2: oswald.pnmw@hotmail.com / 12345678
- User 3: kavon.hlmf@yahoo.com / 12345678
Features
Regular Listing & Online Listing
Directory Hub supports regular listing which for business with a physical location. In addition, you can also create an online listing for an online business without a physical location like an e-commerce website, an online consulting service, etc.
QR Code for Business Listing
The business listing detail page provides the QR Code function that you can generate a QR code for the page, and send it to anyone or print it out.
Advanced Search Functionality
The Directory Hub provides smart search functionality for visitors. The search bar is as simple as just one text entry field that users can put any search keywords like business names, locations, postal codes, or anything. The search function will come with the most relevant results. What’s more, users can use the data filter to narrow down search results by locations, ratings, nearby distances, etc.
Multiple Countries Support
Directory Hub supports multiple countries in one website. Thus, users can post listings from different countries, and they can easily switch between countries to view all listings in a single country scope.
Multi-Level Categories
Directory Hub supports unlimited level of category structure, which gives buyers the maximum ability of create any type of business directory. For example, you can easily build a category structure of restaurant like: Restaurants > American Restaurants > Burgers.
Multi-Categories per Listing
With Directory Hub, you can assign multiple categories to one listing, which is perfectly fit for real-world situations. For example, a law firm may practice many laws such as immigration law, real estate law, senior law, or business law. So in this case, a listing of a law firm can have categories in immigration law, real estate law, senior law, and business law. Buyers can easily do this in Directory Hub.
Muti-Languages Support
Directory Hub supports 62 languages:
Afrikaans, Albanian, Arabic, Armenian, Azerbaijani, Belarusian, Bengali, Bosnian, Bulgarian, Catalan, Chinese (Simplified), Chinese (Traditional), Croatian, Czech, Danish, Dutch, English, Estonian, Finnish, French, Galician, Georgian, German, Greek, Haitian Creole, Hebrew, Hindi, Hungarian, Icelandic, Indonesian, Irish, Italian, Japanese, Korean, Kyrgyz, Latvian, Lithuanian, Luxembourgish, Macedonian, Malay, Mongolian, Myanmar (Burmese), Nepali, Norwegian, Persian, Polish, Portuguese (Portugal, Brazil), Romanian, Russian, Serbian, Slovak, Slovenian, Somali, Spanish, Sundanese, Swedish, Thai, Turkish, Turkmen, Ukrainian, Uzbek, Vietnamese
Each registered user or website visitor can set his or her preferred language either through user profile page or website footer.
Administrator Dashboard
Directory Hub provides a user-friendly and modern designed administrator dashboard for a website owner to handle all tasks including approve or disapprove listings, comments, or suspend or unlock user accounts, manage locations, categories, custom fields, payment plans, subscriptions, and another website settings.
Custom Field
There are four types of custom fields (text, single select, multiple select, link) you can add to each type of category.
If you have a category of real estate, you can create one single select of the custom field named Type with values: apartment, condo, single-family, multi-family, mobile home, house; one multiple select custom field named Features with values: river-front, outdoor kitchen, garage parking, basement; one text custom field named additional description; and one link custom field named website.
Also, if you have a category of automotive, you can create one single select of a custom field named Brand with values: Toyota, Honda, Ford, BMW, etc; one single select of a custom field named Year with values: 2012, 2013, 2014, 2015, etc; one multiple select custom field named features with values: the leather seat, hybrid, GPS, etc; one of text custom field named Seller Notes; and one link custom field named website.
Location Dataset
Directory Hub has a build-in location dataset (states, cities, and latitude & longitude) of 13 countries in Australia, Brazil, Canada, Central African Republic, Czech Republic, Germany, France, United Kingdom of Great Britain and Northern Ireland, India, Mexico, Netherlands, Romania, and United States. The out-of-box build-in location (country, state, city, latitude, and longitude) dataset saves you time and effort from entering each place manually to the website database. If you do not see a country of your desire, you can send a new country request.
For available country location SQL files, you can download from Google Drive: https://drive.google.com/drive/folders/1w-IVw7gdi6oBQt43gJ3kAV9T_EHfzFSa?usp=sharing
(file name format: cities_2-letter-country-code.sql, for example, cities_in.sql is for the India location dataset)
OpenStreetMap
Directory Hub uses OpenStreetMap and Leaflet JS plugin to handle and render maps in a single listing page, listing by state page, and listing by city page.
Google Map
You can also choose to use Google Map on the website to get full features of Google map like directions, street views, etc.
Configurable Billing Plan
Directory Hub has flexible subscription plans and you can easily customize each subscription plan. For example, you can set plan price, billing cycle (monthly, quarterly, yearly), number of the featured listings.
PayPal, Razorpay, Stripe, PayuMoney Subscription
Directory Hub uses PayPal, Razorpay, Stripe, and PayuMoney payment gateways to handle and keep track of subscription payments. Users can also view their subscription status, payment history, and invoices on the user dashboard portal.
5-Star Rating & Review
Directory Hub uses a 5-star rating and review system where users can rate and write reviews on a business listing with uploaded photos. The rating includes 4 dimensions (Customer Service, Quality, Friendly, Pricing) besides the Overall Rating. Admin user is able to manage (view, approve, disapprove) all website ratings and reviews.
Google reCAPTCHA
Directory Hub supports Google reCAPTCHA version 2 checkbox on the login form, sign up form, and the contact form. You can easily enable or disable Google reCAPTCHA on those forms to prevent spams.
Social Login
Directory Hub supports social accounts login with Facebook, Google, Twitter, LinkedIn, and GitHub. You easily can configure, enable, disable the social account login settings in the Admin Dashboard.
Ad Networks Spaces
Directory Hub has a build-in Ad Networks Blocks tool, which allows you to insert any advertisement code (such as Google AdSense, Media.net, etc.) to different types of pages, and to different types of positions inside a page. You can also enable or disable or delete certain ad blocks in the ad blocks management panel.
Messaging
Directory Hub has a build-in message system where registered users can send and reply messages regarding the listings they posted on the website. Admin user has the ability to moderate all messages among all registered users.
Blog
Directory Hub uses a canvas blog system that offers flexible and powerful blogging and content management functionality. It’s easy to manage blog posts, topics, tags through the user-friendly canvas blog backend dashboard.
Google Analytics
Directory Hub allows you to put your google analytics tracking code to monitor the website traffic from the General Settings page of the administrator dashboard. It also allows you to filter out administrator traffic.
SEO
Directory Hub puts SEO in mind too. Thus, admin can easily set up the homepage title, homepage keywords, homepage meta description on the admin dashboard general settings page.
Highly Customizable Website
Directory Hub offers a website customization feature, which you can change theme colors, homepage (also inner page) heading background (color, image, or youtube videos), menu background color, menu font color, footer background color, footer font color, website logo, website favicon.
100% Editable Languages Text
All of the text in the Directory Website are editable. That means you can change any text that you see on the website to whatever other text you like to make it more suitable for your own business needs. You can also sync and store all your changed text to the website database permanently to avoid future updates overwrite.
Youtube Video
Besides the photo gallery, you can also insert the youtube video to the business listing page to get even more eye-attracting and positive impressions.
Photo Gallery
Upload photo gallery images for any directory, and display on the business listing page as justified waterfall photos. It’s mobile responsive and fantastic looking.
Products
You are able to insert product type of data to the listing page. For example, local store hot selling products, restaurant food menu, law firm services, hotel rooms, and much more. The product type of data allows you to add unlimited customizable features to each product. It gives you the maximum customizable ability to suit your needs.
Listing Sections
The listing page is customizable too. You are able to create/rank unlimited sections to each listing of your own. Inside the section, you can also add unlimited products to your section, and show them all to your website visitors.
Listing Leads
The lead generation form on the listing detail page where non-registered website visitors can submit inquiries to the listing owner and website administrator. All listing leads can be exported to CSV, Excel, or PDF.
CSV Bulk Importer
Directory Hub included the CSV file bulk importer tool, which you can import your business listing records (now support both basic info & custom fields) to the website in just a few steps without manually enter listings one by one. It’s a time-saving feature, and you can set up and running your website instantly.
Credits
- Unsplash: https://unsplash.com
- Laravel: https://github.com/laravel/laravel
- Bootstrap: https://getbootstrap.com/
- canvas: https://github.com/cnvs/canvas
- laravel-messenger: https://github.com/cmgmyr/laravel-messenger
- comments: https://github.com/laravelista/comments
- searchable: https://github.com/nicolaslopezj/searchable
- typeahead.js: https://github.com/twitter/typeahead.js
- startbootstrap-sb-admin-2: https://github.com/BlackrockDigital/startbootstrap-sb-admin-2
- Leaflet: https://leafletjs.com/
- LaravelInstaller: https://github.com/rashidlaasri/LaravelInstaller
- seotools: https://github.com/artesaos/seotools
- laravel-paypal: https://github.com/srmklive/laravel-paypal
- Purifier: https://github.com/mewebstudio/Purifier
- Trumbowyg: https://alex-d.github.io/Trumbowyg/documentation/
- goodshare.js: https://github.com/koddr/goodshare.js
- laravel-review-rateable: https://github.com/codebyray/laravel-review-rateable
- rateYo: https://github.com/prrashi/rateYo
- jquery-bar-rating: https://github.com/antennaio/jquery-bar-rating
- laravel-google-translate: https://github.com/tanmuhittin/laravel-google-translate
- Justified-Gallery: https://github.com/miromannino/Justified-Gallery
- colorbox: https://github.com/jackmoore/colorbox
- simplemde-markdown-editor: https://github.com/sparksuite/simplemde-markdown-editor
- Laravel Socialite: https://github.com/laravel/socialite
- laravel-translation: https://github.com/joedixon/laravel-translation
- Spectrum: https://seballot.github.io/spectrum
- jquery.youtube-background: https://github.com/stamat/jquery.youtube-background
- laravel-recaptcha: https://github.com/biscolab/laravel-recaptcha
- laravel-sitemap: https://github.com/Laravelium/laravel-sitemap
- bootstrap-select: https://github.com/snapappointments/bootstrap-select/
- jQuery.qrcode: https://larsjung.de/jquery-qrcode/
- opening-hours: https://github.com/spatie/opening-hours
- Royalty-free images: https://www.pexels.com
- Royalty-free icons: https://www.flaticon.com
Requirement
- Apache Web Server.
- PHP >= 7.2.0
- MySQL >= 5.6
- BCMath PHP Extension
- Ctype PHP Extension
- Fileinfo PHP extension
- JSON PHP Extension
- Mbstring PHP Extension
- OpenSSL PHP Extension
- PDO PHP Extension
- Tokenizer PHP Extension
- XML PHP Extension
PHP symlink() function must be enabled on your hosting server. Otherwise, the Directory Hub will not able to install successfully.
Installation
Install & Run on a localhost webserver like XAMPP or WAMP, please follow the special instruction here: Install Directory Hub on XAMPP, WAMP
Watch the installation tutorial video: https://www.youtube.com/watch?v=hkshnzQ90QU
Prepare
- Upload
directory_hub.zipintopublic_htmlor otherhtmlroot depends on your web server. - Unzip
directory_hub.zip. - Create a database on your web server (database name, database user, database password will be used in the next installation process).
- Go to
http://your-domain.comorhttps://your-domain.comto start the installation wizard. - Follow the install wizard steps to finish website installation (please refer to the following screenshot for details).
ATTENTION PLEASE:
1. Please put
directory_hub.zipon a domain root or a sub-domain root (https://your-domain.comorhttps://sub-domain.your-domain.com).2. The script on sub-URL (
https://your-domain.com/directory/orhttp://your-domain.com/directory/) will NOT run properly.3. You should upload directory_hub.zip to your web server, and then unzip it INSTEAD OF unzipping directory_huz.zip then upload all files to your server. Because you might miss some hidden files if uploading unzipped files individually, which will cause installation errors.
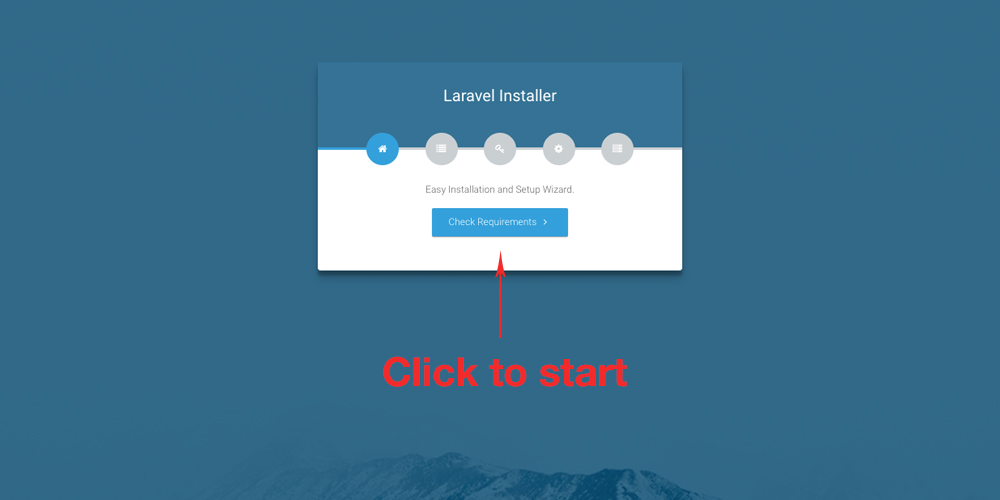
Run install script
Step 1
- Click
Check Requirementsbutton.
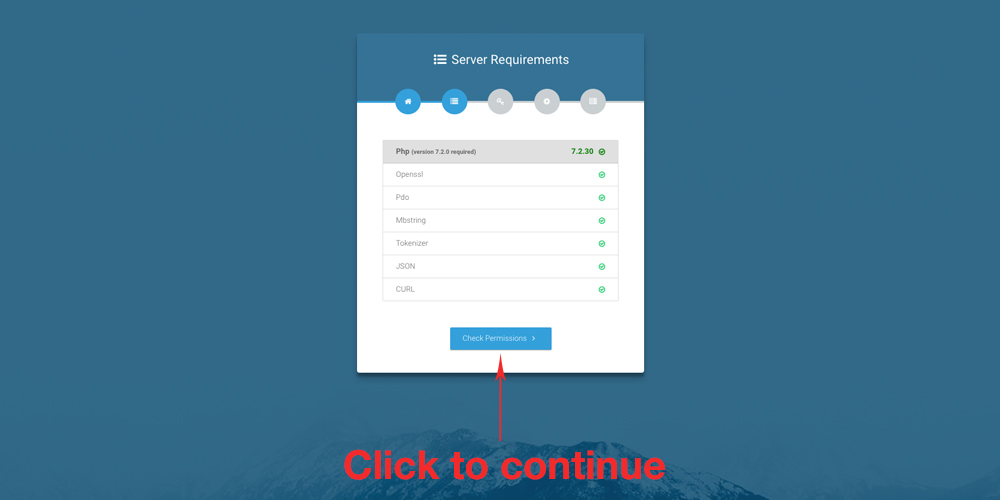
Step 2
- Click
Check Permissionsbutton.
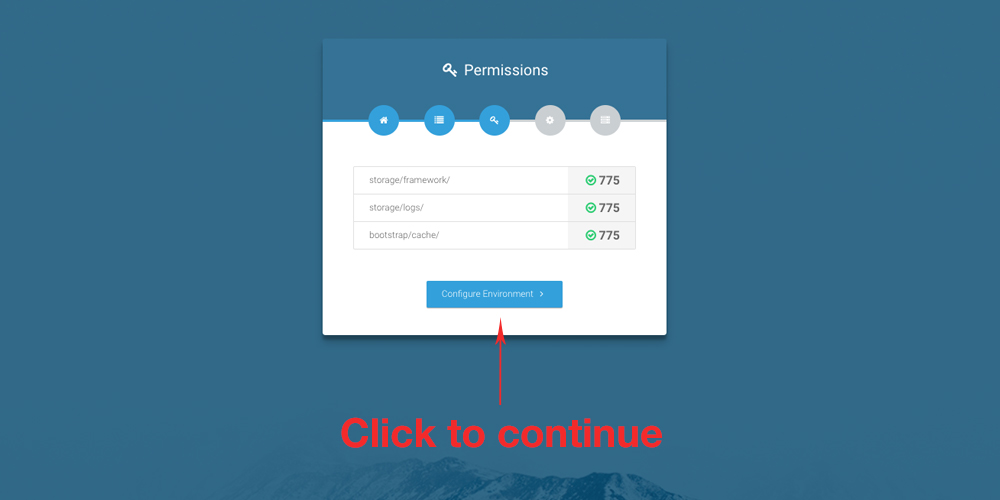
Step 3
- Click
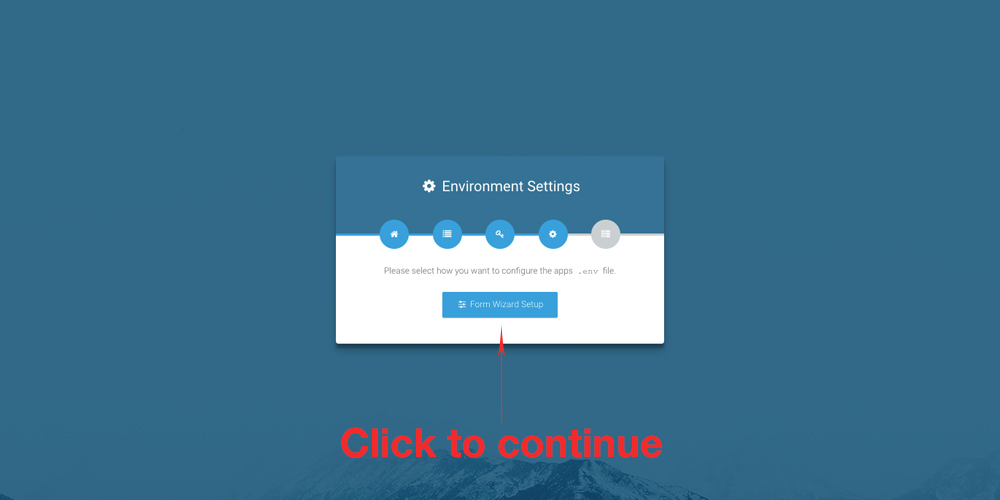
Configure Environmentbutton.
Step 4
- Click
Form Wizard Setupbutton
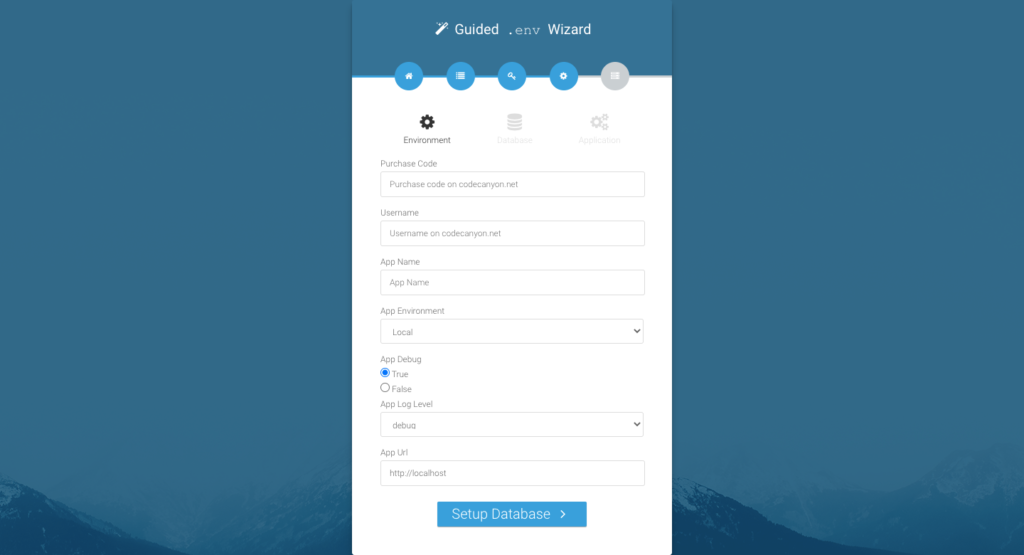
Step 5
- Purchase Code – your CodeCanyon purchase code
- Username – your CodeCanyon account username
- App Name – your desired website name
- App Environment – Production
- App Debug – False
- App Log Level – debug
- App Url – your domain to this website like
https://your-domain.com - Click
Setup Databasebutton.
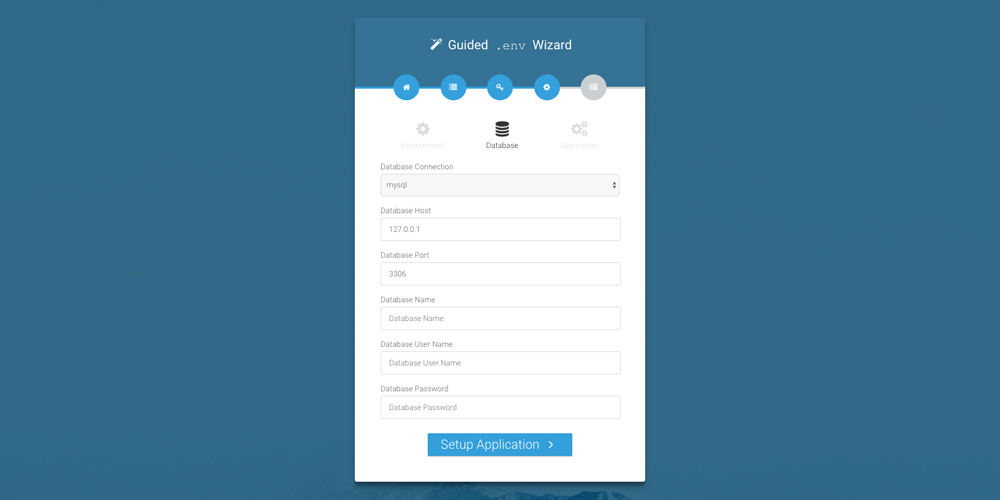
Step 6
- Put
Database Name,Database User Name,Database Passwordto correspond form fields. - Click
Setup Applicationbutton.
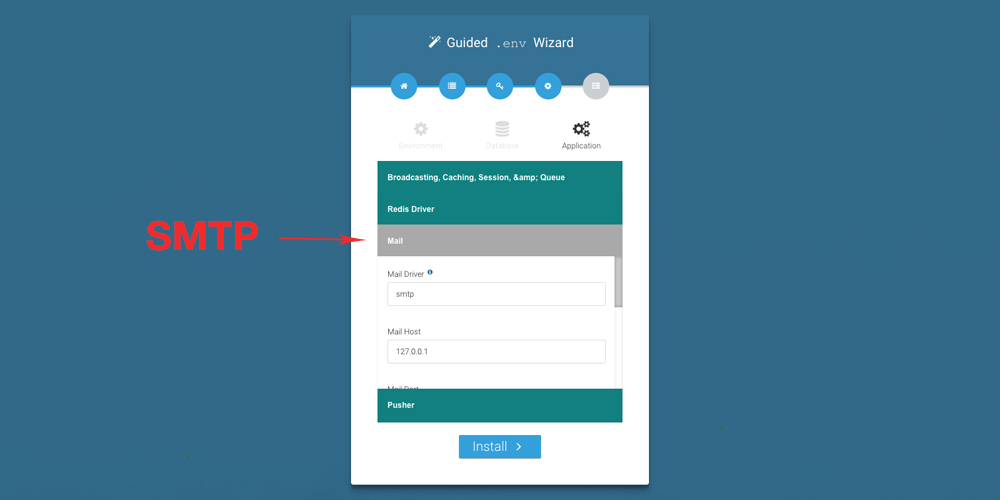
Step 7
- (Optional) Put SMTP info to the
Mailtab. The website will use the SMTP server to send emails. You can always enter SMTP later after installation in Admin Dashboard > Setting > General > SMTP Tab. - Click
Installbutton (Please wait until finish).
Step 8
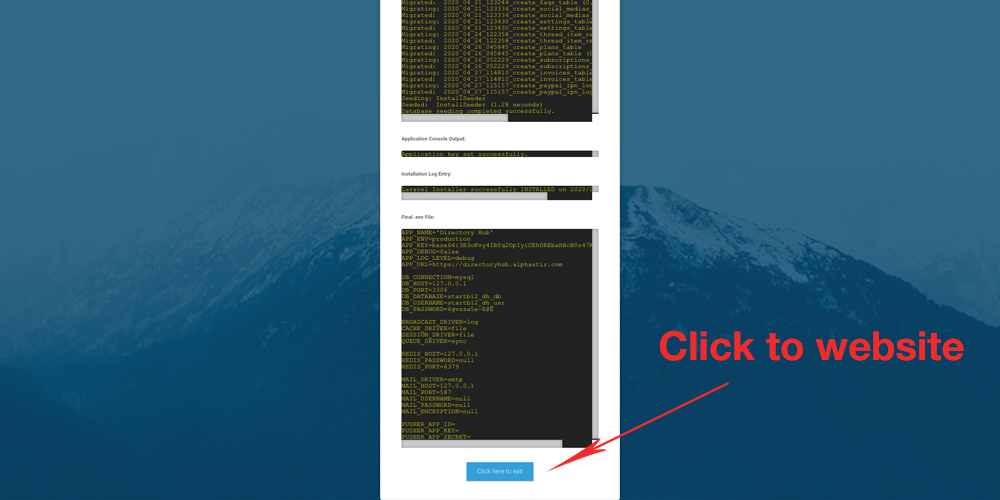
- You should be able to see successful messages and all logs.
- If you see errors, please follow the error message to fix it. And delete all website files on server root, and clear database before re-start the installation.
- Click
Click here to exitbutton to the website homepage. - Default admin login: email: admin@mail.com & password: 12345678
Configuration
With the database populated and the script uploaded, it’s time to set the initial configuration.
Login as admin (admin@mail.com / 12345678) at http://your-domain.com/login
Verify purchase code and domain
The purchase code and the domain need to be verified before accessing 100% functionalities of the script. Please follow the guide below to proceed with purchase code and domain verification.
https://alphastir.com/how-to-verify-purchase-code-domain/
Change admin’s password and email
You may want to change the default email and password. To change your password, click on Profile on the left sidebar. Change the default email address to an email you plan to use to login and manage your site.
In the right side main content area, find Change password link. Enter your old password and the new one to change your password.
Set up website language
Directory Hub supports 63 languages:
Afrikaans, Albanian, Arabic, Armenian, Azerbaijani, Belarusian, Bengali, Bosnian, Bulgarian, Catalan, Chinese (Simplified), Chinese (Traditional), Croatian, Czech, Danish, Dutch, English, Estonian, Finnish, French, Galician, Georgian, German, Greek, Haitian Creole, Hebrew, Hindi, Hungarian, Icelandic, Indonesian, Irish, Italian, Japanese, Korean, Kyrgyz, Latvian, Lithuanian, Luxembourgish, Macedonian, Malay, Mongolian, Myanmar (Burmese), Nepali, Norwegian, Persian, Polish, Portuguese (Portugal, Brazil), Romanian, Russian, Serbian, Slovak, Slovenian, Somali, Spanish, Sundanese, Swedish, Thai, Turkish, Turkmen, Ukrainian, Uzbek, Vietnamese
The default language is English. To use another language, click on General on the left sidebar, in the Info tab, you will find the Default Language selector, which allows you to switch languages.
Admin Dashboard
Before going live, it’s necessary to configure some settings in the admin area. When you on the website front, you can access the admin area by moving the mouse on the top right of your default name, and then click the Dashboard menu when a sub-menu shows up.
Categories
Click on Category -> Category on the left sidebar. The installation has created 22 default categories for you. You can edit and delete them based on your own requirements.
When creating a category, in the Category icon input field, you can enter the HTML code for an icon for this category. For example, those provided by FontAwesome: <i class="fas fa-icon" aria-hidden="true"></i>, then you should enter fas fa-icon
On this page you can also edit a particular category.
Custom Fields
Click on Category -> Custom Field on the left sidebar. The installation has created custom fields for each default category for you. You can edit and delete them based on your own requirements.
When creating a custom field, there are 4 types of custom fields (text, select, multi-select, link). If you are creating select or multi-select custom fields, you need also enter the default options for both types of custom fields in the Custom field seed value input field. Each default option value should separate by a comma.
Locations
Click on Location -> Country/State/City on the left sidebar, you can access defined location data of the website. By default, the installation has all states, cities of the United States.
Check-in the ‘SQL’ folder if you find cities_xx.sql where ‘xx’ represents your country code and use PHPMyAdmin to import that into your database tables so you don’t have to manually enter all cities/states/provinces/countries yourself. Contact me for cities for other countries, I can generate a SQL file with cities for all countries that available on http://download.geonames.org/export/dump/.
Currently, we offer location data of Australia (au), Brazil (br), Canada (ca), Central African Republic (cf), Czech Republic (cz), Germany (de), France (fr), United Kingdom of Great Britain and Northern Ireland (gb), India (in), Mexico (mx), Netherlands (nl), Romania (ro), and the United States (us).
For available country location SQL files, you can download from Google Drive: https://drive.google.com/drive/folders/1w-IVw7gdi6oBQt43gJ3kAV9T_EHfzFSa?usp=sharing
You must create at least one city, one state, and one country for the website.
Plan & Subscription
In order to accept payments from users wanting to list their items on your site, you must create at least one pricing plan, even if it’s a free plan. By default, the installation has created 4 pricing plans for your convenience.
Click Subscription -> Plan on the left sidebar. The Plan page lets you create and edit different pricing plans to monetize your site using the PayPal payment gateway.
Click on Add A Paid Plan button, you can create unlimited paid plans.
- Monthly
- Quarterly
- Yearly
In each plan, you can specify plan name, description, number of featured listings, price, and status.
Social Login
Click Social Login on the left sidebar of TOOLS section, you can manage all (Facebook, Twitter, Google, LinkedIn, GitHub) social login settings. You can enable or disable any social login. Also, you can set the client ID and client secret values, which you should obtain from each social media account.
For how to obtain a client ID and client secrete, please follow the guideline here:
Facebook: How to get Facebook client id and secret key?
(The callback URL is https://your-domain/auth/facebook/callback)
Twitter: How to get Twitter client id and secret key?
(The callback URL is https://your-domain/auth/twitter/callback)
Google: How to get Google Client ID and Secret?
(The callback URL is https://your-domain/auth/google/callback)
LinkedIn: How to get LinkedIn Client ID and Secret?
(The callback URL is https://your-domain/auth/linkedin/callback)
GitHub: How to get GitHub Client ID and Secret?
(The callback URL is https://your-domain/auth/github/callback)
There are also many video tutorials on YouTube where you can get a comprehensive guide.
Advertisement
Click Ad Blocks on the left sidebar of the TOOLS section, you will find the management panel for advertisement blocks of the website. In this panel, you can create, edit, enable, disable advertisement blocks, and configure which pages, and positions of a page you want your ads to display. As well as the display ad alignment (left, center, right) on the page.
You may also need to insert an initial javascript code in the <head></head> tag or before </body> tag depends on what ad network you have. To do so, go to General on the left sidebar, you will find the HTML tab. In the HTML tab, you are able to insert javascript code between <head></head> or before </body> of HTML pages.
Language
Click Language > Edit Languages on the left sidebar of the TOOLS section, you will find the language panel for the website. In this panel, you can edit website language text for each of the languages available on the website.
Click Language > Sync Languages on the left sidebar of the TOOLS section, you will find the sync languages page. On this page, you can transfer all of the language text files to store in the website database, and let the website load all language text from the database directly. By doing this, you will be able to update future releases without overwriting your existing language text if you have edited your own version of language text.
Theme
Click Themes > Manage Themes on the left sidebar of the SETTINGS section, you will find the website default theme, click the Detail button, you will see Edit Colors and Edit Headers options for you to customize the styles of the theme.
Google reCAPTCHA
Click reCAPTCHA on the left sidebar of the TOOLS section, you are able to configure form ReCaptcha for login form, sign up form, and the contact form. The ReCaptcha uses Google reCAPTCHA version 2 Checkbox. You need to get the site key and site secret from the Google ReCaptcha Admin page.
https://www.google.com/recaptcha/admin/
How to Add Google ReCaptcha: How to Add Google ReCaptcha
Site Settings
Click General on the left sidebar, you can define some aspects that control the site’s functionality. On this page, you will find 5 tabs.
- Info tab
- SMTP tab
- SEO tab
- Google Analytics tab
- HTML tab
Site Settings: Info tab
The Info tab lets you define some default values of the website. Each field is self-explanatory, but if you need more clarification, please contact me.
- Country – all listings will be created inside of the selected country.
- Lat – the default latitude used by the homepage to determine nearby listings.
- Lng – the default longitude used by the homepage to determine nearby listings.
Site Settings: SMTP tab
The SMTP tab lets you config website SMTP emails. Please contact your hosting server for the values of each form field.
Site Settings: SEO tab
On the SEO tab you can define the SEO of the website homepage. Each field is self-explanatory, but if you need more clarification, please contact me.
Site Settings: Google Analytics tab
On the Google Analytics tab, you can enter the Google Analytics Tracking ID, and enable Google Analytics tracking. Also, you can filter out your own activity by selecting Do not track admin traffic.
Site Settings: HTML tab
On the HTML tab, you can enter custom HTML code like javascript to <head></head> and </body> section of the website. One of the examples is to insert a third party live chat widget to the website.
Payment: Bank Transfer
On Setting > Payment > Bank Transfer, you can config the bank transfer payment gateway. Thi sis a manual payment gateway, means you as a website administrator need to manually verify each of the payment a website user submitted. You can reject or approve each bank transfer payment by verifying the information the user submitted.
Payment: PayPal
On Setting > Payment > PayPal, you can define all PayPal settings. The “Sandbox” mode is enabled by default. When you are ready to go live, please make sure to switch the PayPal mode to “Live”.
For how to obtain each input field of PayPal, please visit the PayPal page at https://developer.paypal.com/docs/archive/nvp-soap-api/apiCredentials/#create-an-api-signature
Please follow the instruction on this post to obtain the PayPal payment gateway credentials: Set Up PayPal Gateway on Directory Hub
If you still have questions on how to set up the PayPal payment gateway, please contact me.
Payment: RazorPay
On Setting > Payment > Razorpay, you can config the Razorpay payment gateway. Make sure you added the website Razorpay webhook URL to your Razorpay dashboard. The webhook is used to verifying future subscription payments. Thus, after a user paid the initial subscription on the website, this user will be automatically charged every period of the subscription payment. The Razorpay payment gateway will send a post request to the webhook URL. The website uses the webhook URL to verify each of the subscription payment.
Payment: Stripe
On Setting > Payment > Stripe, you can config the Stripe payment gateway. Make sure you added the website Stripe webhook URL to your Stripe dashboard. The webhook is used to verifying future subscription payments. Thus, after a user paid the initial subscription on the website, this user will be automatically charged every period of the subscription payment. The Stripe payment gateway will send a post request to the webhook URL. The website uses the webhook URL to verify each of the subscription payment.
Payment: PayuMoney
On Setting > Payment > Payumoney, you can config the PayuMoney payment gateway.
Site Management
Now that you have your site up and running, it’s time to learn how to manage it using the Admin Dashboard.
Listings
Click on Listing -> All listings on the left sidebar. The Listings page shows all the listings submitted by users. Here you can approve, suspend, delete, promote/feature, and edit each listing with the click of a button.
All listings created by users will automatically set to pending status, the admin needs to approve them in the admin dashboard Listing section. However, you can change the listing settings in Admin Dashboard > Settings > General > Listing, where you can auto-approve all listing submissions, and you can set how many photos gallery to upload per listing for users.
The installation has created 17 demo listings for each category for your convenience.
Listing > Manage Sections
On the edit listing page, click Edit Sections button on the top of the page. You will able to manage listing sections. In the Manage Listing Sections page, you are able to create a new custom section, rank up or rank down each of your custom section. In addition, you are able to assign products into each of your custom section, and the assigned products will be able to display on the website frontend listing page.
Listing Claims
Click on Listing -> Listing claims on the left sidebar. The Listing claims page shows all the listing claims submitted by users. Here you can approve, disapprove, or delete each submitted listing claim. After the listing claim been approved, the ownership of the listing will be transferred to the user who submitted the listing claim.
Listing leads
Click on Listing -> Listing leads on the left sidebar. The Listing leads page shows all the listings leads submitted by non-registered website visitors. You can manually create, edit, or delete listing leads. You can also export the listing leads in CSV, Excel, or PDF.
Rating & Reviews
Click on Reviews -> All reviews on the left sidebar. The Manage Reviews page shows all the business listing ratings and reviews. Here you can filter all reviews, pending reviews, approved reviews, and my reviews. You, as an admin, can also manage each review (view, approve, disapprove, or edit if it’s your review).
Messages
Click on Messages -> All messages on the left sidebar. The Messages page shows all the messages between users. Here you can view, edit each message with the click of a button.
Comments
Click on Comments -> All comments on the left sidebar. The Comments page shows all the comments made by users on listing pages or blog post pages. Here you can approve, and delete each comment with the click of a button.
All comments post on the website are automatically set to pending status, the admin needs to approve them in the admin dashboard comment section.
Product
Click on Product -> Product on the left sidebar. The Product page shows all products created by you or other website users. Here you can approve, disapprove, edit each product. You can also create a new product for you or other website users.
Click on Product -> Attribute on the left sidebar. The Attribute page shows all available product attributes created by you or other website users. Here you can edit each product attribute. You can also create a new attribute for you or other website users.
Click on Settings -> General -> Product on the left sidebar. The Setting page allows you to edit the product setting. There are 3 settings are available: Auto Approve, Maximum Gallery Photos, and Currency Symbol.
How to Put Product to Listing?
Blog
Click on Blog on the left sidebar. The Blog page lets you manage, post, edit, delete website blog posts, blog topics, and blog tags on one super user-friendly page. The blog functionality is provided by Canvas – A Larvel publishing platform. For more information, please visit at https://github.com/cnvs/canvas
If you have questions about Blog, please contact me.
Interface: Sections
Click Sections -> FAQ/Social Media/Testimonial, you can edit website front interface sections.
- FAQ – this section shows on contact page as a block section.
- Social Media – this section shows on website footer as a block section.
- Testimonial – this section shows on website homepage as a block section.
Interface: Pages
Click Pages -> About/Privacy Policy/Terms of Service, you can edit website pages, and choose to display or hide each page.
- About – about page shows on website top menu
- Privacy Policy – privacy policy shows on website footer menu.
- Terms of Service – terms of service shows on website footer menu.
Users
Click on User on the left sidebar, the User page shows all the users registered on your site. Here you can view each user’s information (name, email, about bio, profile image, date of registration), change each user password, suspend user accounts, and delete a user account permanently.
After a user sign up on website, an email sent to user’s registered email address. The user need to click the verification link in the email to active the account.
Upgrade Instruction
This section is for existing buyers who want to upgrade Directory Hub from future releases.
The upgrade won’t remove or overwrite your existing data in database. It also won’t delete or replace any of your existing listing feature images and gallery.
ATTENTION PLEASE:
Please backup your server files and database, before proceeding upgrade.
Step 0
- Before proceeding with the upgrade, please make sure you have the latest version Directory Hub script downloaded from CodeCanyon.
- Download Link: https://codecanyon.net/item/directory-hub-listing-classified-platform/26890239
Step 1
- Upload
directory_hub_upgrade_step_1.zipto your website root (https://your-domain.com/directory_hub_upgrade_step_1.zip). - Unzip
directory_hub_upgrade_step_1.zip. - Select overwrite or replace all files and folders if prompted.
Step 2
- Upload
directory_hub_upgrade_step_2.zipinside oflaravel_projectfolder (https://your-domain.com/laravel_project/directory_hub_upgrade_step_2.zip). - Unzip
directory_hub_upgrade_step_2.zip. - Select overwrite or replace all files and folders if prompted.
Step 3
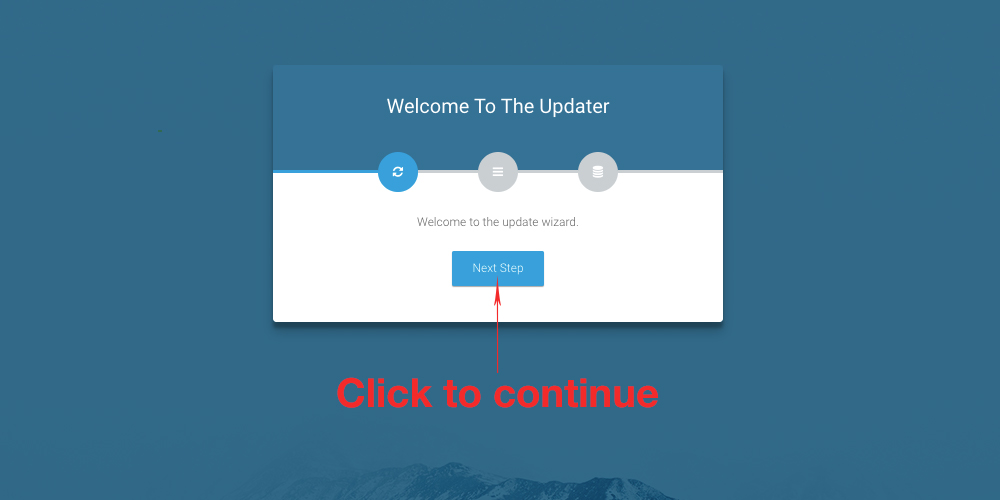
- Go to
https://your-domain.com/updateto start Updater Wizard (If there is nothing to update, the link will show a 404 not found error page). - Please continue and follow the steps.
Step 4
- Click
Next Stepbutton
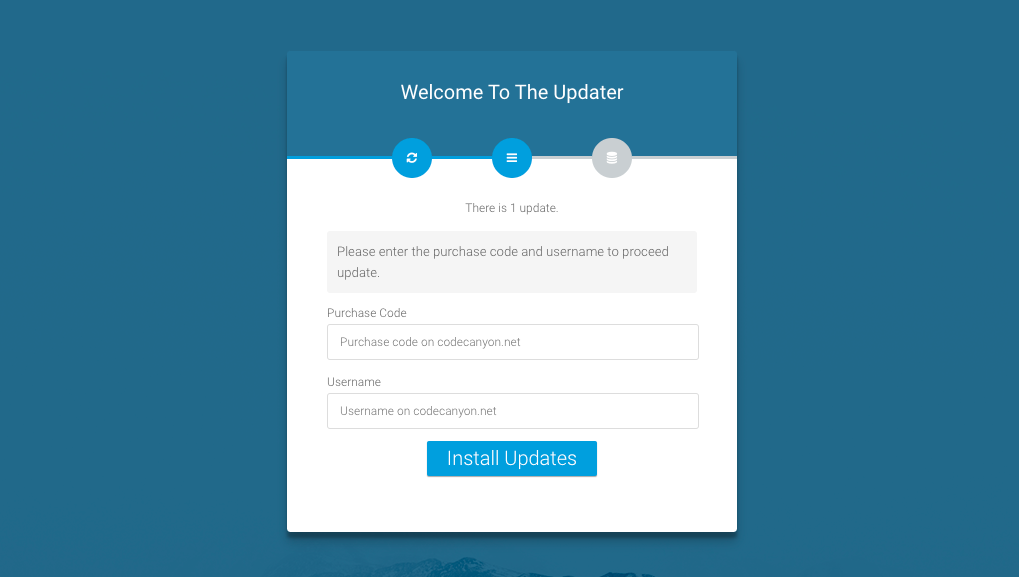
Step 5
- Purchase Code – your CodeCanyon purchase code
- Username – your CodeCanyon account username
- Click
Install Updatesbutton
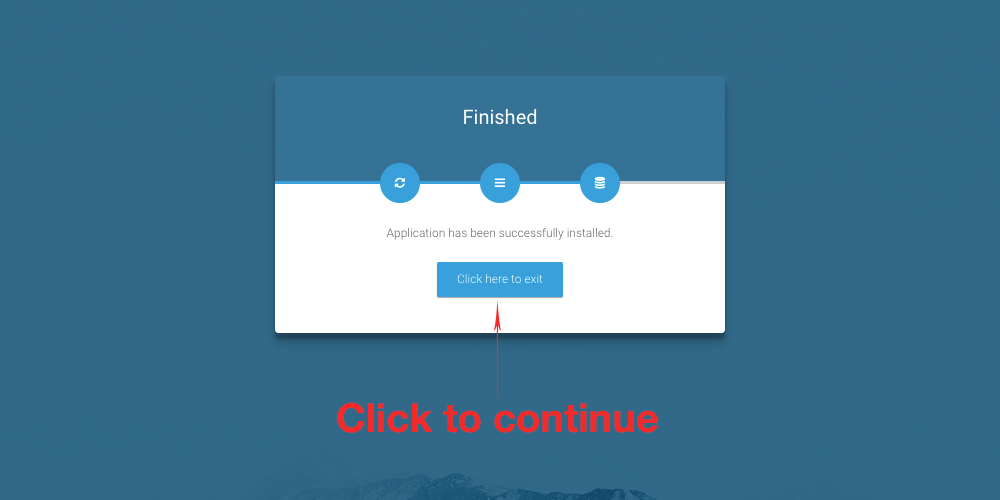
Step 6
- Click
Click here to exitbutton - The upgrade process has completed.
Help and Support
Please send all technical support requests through my CodeCanyon profile page.
Update History
Release #38 – June 23, 2022
- Added thumbnail image support for categories.
- Added header background style support for category pages.
- Fixed error of pricing feature description does not start a new line on the pricing page.
- Updated OpenStreetMap version to 1.8.0.
- Added popup info window on the map.
- Fixed the error of not removing phone and email when data fields are empty on the contact page.
- Added reload this page option for updating geolocation-relevant content on the homepage.
- Changed listing description to the nullable field.
Release #37 – May 22, 2022
- Added Instagram and WhatsApp fields to the listing.
- Added Instagram and WhatsApp fields to the CSV listing importer.
- Fixed about page link on footer not disappear when page disabled.
Release #36 – May 5, 2022
- Fixed Recaptcha login issue in maintenance mode.
- Fixed Stripe currency not being updated issue.
- Updated FontAwesome 5 to version 6.1.1.
- Fixed issue of website language not being updated in Google Recaptcha.
Release #35 – February 5, 2022
- Fixed issue that file_get_contents function is disabled in some shared hosting for license verification.
Release #34 – January 24, 2022
- Added maintenance mode.
Release #33 – December 19, 2021
- Added listing business hours support in CSV listing importer.
Release #32 – September 25, 2021
- Added PHP 8 support
- Optimized page loading speed for homepage & categories page
- Added test SMTP setting feature in Admin Dashboard
- Re-factored categories and custom fields management pages.
- Added search bar in listing management page.
Release #31 – August 29, 2021
- Added Opening Hours feature to business listing.
- Re-designed interface of featured listing box in listings results pages.
- Re-factored custom field deletion to allow force delete.
Release #30 – August 9, 2021
- Added indexes to database tables.
Release #29 – July 3, 2021
- Added session setting in Admin account portal
- Added enable/disable option for website languages.
- Added the URL slug text input option in country/state/city edit pages.
- Fixed dashboard sidebar not scrolling on mobile device issue.
- Fixed listing URL slug not been generated for listing title in other languages except English during CSV listing importing.
- Adjusted the listing detail page blur version header image background to make it centered.
- Added pagination for sitemap.
- Added sitemap for states and cities pages.
- Added enable/disable option for country.
- Added listing featured image URL and listing gallery images URLs support in CSV Listings Importer.
Release #28 – June 6, 2021
- Added listing owner information on all listing page in admin dashboard.
- Re-factored website search to show most relevant results.
- Auto-generate listing SEO slug url based on listing title.
- Lead Generation Form (Contact Form) on Listing Detail page.
- Export listing leads to CSV, Excel, or PDF.
- Optimized SQL queries on website source code for website loading speed performance improvements.
- Added remove image function for listing feature image, product feature image, website logo image, website favicon image, user profile image.
- Fixed country/state/city selector not showing the selected info error in listing create/edit pages.
- Added the listing owner option in listing create page in Admin dashboard.
- Fixed show similar listings with the same country of the listing detail page.
Release #27 – April 8, 2021
- Added price number format for product prices.
- Added multiple translation files for Laravel default auth emails.
- Fixed website logo image process issue which causes low-quality image.
Release #26 – March 1, 2021
- Fixed bug on admin listing management page query may cause 414 HTTP error on some hosting servers with low LimitRequestLine of Apache server.
Release #25 – Feb 27, 2021
- Fixed bug on Twitter login redirecting issue.
- Fixed bug on CSV listing importer data processing issue.
- Fixed bug on listing search function results not showing on some shared hosting server issue.
Release #24 – Feb 25, 2021
- Re-factored advanced search function.
- Added data filter to all listing results pages of the frontend website.
- Added QR code function to the business listing detail page.
- Added online type of listing support.
- Added pricing table page.
- Added a number limit of free listing configurations for website pricing plans.
- Added listing settings configuration.
- Added CSV listing importer custom fields support.
- Optimized frontend website SQL queries for better page loading performance.
- Build a website theme system for theme extensibility.
- Fixed a few reported bugs.
Release #23 – Jan 23, 2021
- Fixed bug of user dashboard listing index edit button link.
Release #22 – Jan 12, 2021
- Fixed bug of frontend website country selector after an country deleted by SQL query.
Release #21 – Jan 6, 2021
- Add PayuMoney payment gateway.
- Add multiple countries directory support.
- Support 62 languages to the website.
- Re-designed listing index pages in admin and user dashboard.
- Re-designed users index page in the admin dashboard.
Release #20 – Dec 7, 2020
- Add category description field in category model.
- Re-design listing index page of admin and user dashboard to load data in chunk.
Release #19 – Dec 4, 2020
- Re-factored source code, and improved page load performance.
- Google map on a business listing page, and categories page.
- Website cache feature.
Release #18 – November 19, 2020
- Add product/product attribute features
- Add customizable listing section feature
- Add a classified feature where user can post ads inside the listing page
- Fixed business claim index page loading bugs
- Fixed listing delete and user delete bugs
- Improved mobile user experiences in the admin dashboard view and user dashboard view.
Release #17 – October 4, 2020
- Add listing SEO-friendly slug link feature.
- Add website sitemap feature.
- Add paid subscription end soon notification feature.
Release #16 – September 27, 2020
- Add Stripe payment gateway
- Add manual Bank Transfer payment gateway
- Fixed reported internal bugs.
Release #15 – September 22, 2020
- Add business listing claim feature.
Release #14 – September 16, 2020
- Add Google reCAPTCHA to the login form, sign up form, and the contact form.
Release #13 – September 13, 2020
- Users are able to upload photos to review
Release #12 – September 8, 2020
- Gird & Map Views on Categories Listing Page.
- Fixed review stars not showing in some browsers & devices.
- Added review rating summary section in business listing page.
- Add contact form in business listing page.
Release #11 – September 2, 2020
- Add error handling for Razorpay Payment Gateway
- Fix issue of listing not showing in the Category page.
- Fix issue of updater page 500 error.
Release #10 – August 23, 2020
- Editable language feature.
- Customization feature.
- Razorpay payment gateway.
- Youtube video on single listing page.
- Bug fix on admin user creation.
Release #9 – July 31, 2020
- Added Multi-Level Categories feature.
- Added Many-to-Many relation between categories and custom fields.
- Added Multi-Categories per Listing feature.
- A simplified search feature to include only search query and nearby city.
- Fixed image cropper on mobile devices.
- Added Indian currency to PayPal gateway.
- Fixed “Save” button not working issues on mobile devices.
Release #8 – July 23, 2020
- SMTP Setting options in Admin Dashboard > Setting > General
- Language Selector in the user profile page and website footer.
- Optimized mobile view of a single listing page.
- Fixed bug of edit listing authentication for users.
Release #7 – July 20, 2020
- Add PHP symlink() function exist check before showing install wizard page.
Release #6 – July 16, 2020
- Advertisement network spaces on the website.
- Social accounts login.
- Admin users are able to insert javascript or html code between <head></head> and before </body> tags on the General Setting page.
Release #5 – July 7, 2020
- Redesigned photo gallery in single listing to use justified photo waterfall and light box.
Release #4 – July 6, 2020
- Fixed admin dashboard redirect issue. The issue happened on some hosting severs, which caused by the MySQL driver returns all query records as String Type even for Integer Type columns. So buyers are not able to access admin dashboard after login.
Release #3 – July 2, 2020
- 5-star rating & review feature.
- Fixed responsiveness issue on the homepage and single listing page.
Release #2 – June 29, 2020
- Bug fixed on listing custom fields.
Release #1 – June 26, 2020
- Multiple Language Support (Arabic, Catalan, German, English, Spanish, Persian-Farsi, French, Hindi, Dutch, Portuguese-Brazil, Russian, Turkish, Chinese)
- Redesigned Single Listing Page.
- Added Similar Listing section in Single Listing Page.
- Added Social Share function in Single Listing Page and Blog Post Page.
- Added Save Listing function.
- Added Google Analytics field in General Settings.
- Optimized Search feature, which users are able to search any thing in a listing including title, description, category, locations, custom fields, etc.
- Optimized website loading speed.
Release #0 – June 11, 2020
- Initial Release.